Friday, July 25, 2008

Flipping the canoe

I flipped the canoe over, and inspected the misalignment problem. It's easy enough to fix. My idea was to fill the depressions (4 of them) under the tape with epoxy/wood flour putty. fmiles on the forum suggested using strips of plywood bedded in putty as a filler less expensive than straight putty. I laid a strip of scrap plywood by the deepest spot, but it was too thick. But it was a great idea.

When I was butt splicing the panels together, I coated the bottom panels with leftover epoxy, so as not to waste it. These panels have little bend, so it didn't affect anything. But because it has cured, I have to sand for adhesion of the next layer.


I sanded quite a while, mostly smoothing down putty that squeezed through the joint from the inside. The putty spots are hard, jagged sandpaper-shredders. I prefer hand sanding: there is just something relaxing about it that quietens the mind and puts everything in perspective. I think I look forward to fairing. You can see in the picture how the 60 grit sandpaper has scratched up the smooth epoxy surface.

I spread epoxy putty in the depressed areas, as wide as the tape will cover. The idea was to build up the area under the tape level, and let fairing putty fill the space in between. 12 ounces of epoxy putty took care of the problem.

Unfortunately, in one area I took care of the problem too well. I built it a bout 1/32 inch too high. That would be a problem in fairing, and I certainly didn't want to sand through fiberglass tape. I knew this stuff is hard, but it hard to realize just how hard. 45 minutes of hard sanding by hand, with 3 paper changes, and I had it level. The high area was only about 6 square inches.

This is the result:

The upper panels

I began by removing the duct tape from the lower chines and bow. It all looked good, except for an area about 18-24" long where the panels were misaligned. As you can see, it is about 1/4" at its worst. This is just something to fix. An asymmetrical depression on the bottom will probably affect tracking.


I am not going to make the mistake of relying on the duct tape again. I drilled every 6-12" and used tie-wraps. The tie-wraps pulled the panels into alignment everywhere except about 6" form the ends. The upper panels wanted to pull inside the chine panels at those points, so I forced them into alignment with blocks. There is a trick using dowels or pipe under the tie-wraps. I'll do that next time.

Next I primed the area with epoxy, and let it sit a little while. Then I spot welded with putty between the stitches. In a few places I covered a tie-wrap with putty by accident, but later discovered that the epoxy won't bond to the nylon so I just pulled them out after cure. Of course, the upper chine is easier to fillet than the lower chine, being flatter.

After the spots were cured, I removed the tie-wraps, and made the fillets. I left the tie-wraps in the bow, and put the bow fillets in in 3 layers, shaping again with the back of a spoon.

I taped the joints while the fillets were tacky. Where I misplaced the tape, reseating it distorted the tape a little.

After the taping, this is how it looked. Notice, also, the panels cut and ready for the D4 on top of the entertainment center.

Thursday, July 17, 2008

Attaching the chine panels

I set aside, or tied to set aside, a weekend for assembling the canoe. The plan was to start early Saturday morning, tape the chine panels to the bottom, prime the edges, wait, apply putty, wait, fiberglass, sleep, get up early Sunday, and repeat with the upper panels. Well, it was a nice plan.

Now for reality. Other responsibilities came up. But I did get a respectable amount done. First order of business - tape the seams. I tried to avoid using stitches for simplicity (I didn't want to fill holes). I used 3M low residue duct tape to tape the seams. It wasn't nearly as easy as it looked in the free canoe plans. Those tutorials were produced by professionals, and this is my first project. Quickly, what I learned:
  • Start with short lengths of tape spaced 12" to 18" apart.
  • After the shape is close, tape the entire seam, pulling it into shape.
  • Most important, stitches are necessary. I used one stitch at the top of the chine panel on the bow and stern. I wish I had used them every 12 or 18 inches, closer in tight bends.
Next, prime the wood with epoxy and putty the joints. This is my first experience puttying joints. Tricky! Someone on the bateau forums suggested putting the fiberglass directly over the wet joints. This would probably save sanding the imperfect joints and spots of putty that are missed. This stuff dries like cement, and shreds sandpaper if you don't approach it slowly. Renee was a lot of help with the joints.


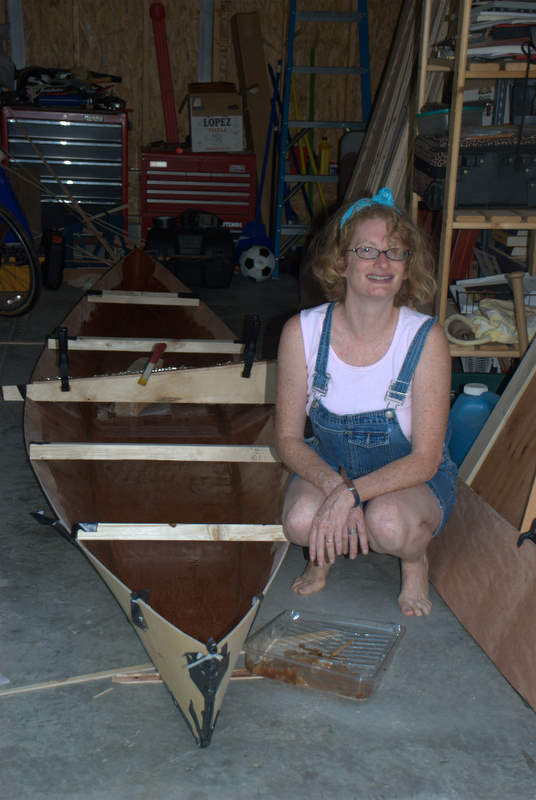
The hardest part to epoxy was the bow and stern. There is not adequate room to work. After trying to putty that narrow angle with a squeegee (messy) and my gloved fingers (more messy), I discovered the back and tip of a plastic spoon did an amazing job. I really dread sanding the mess I made in that area.


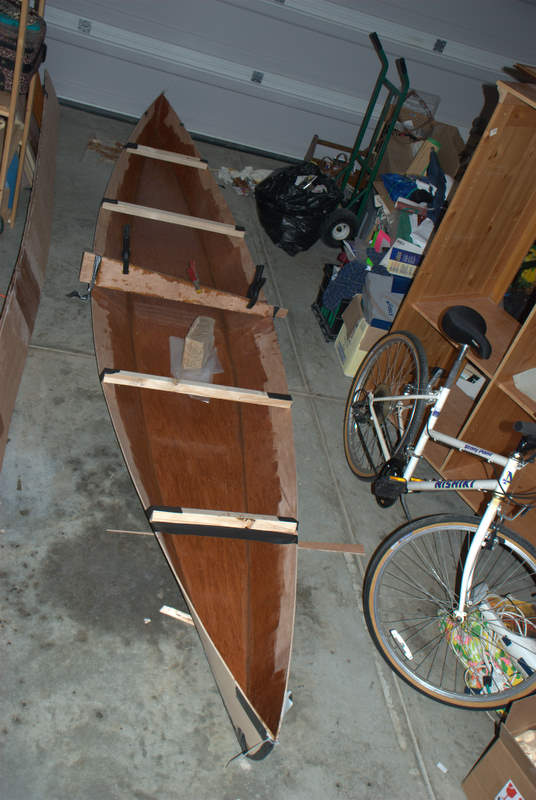
The next morning, I fiberglassed the inside bottom to chine panel joints and bow and stern joints. I put a thin coat of epoxy over the putty, and let it cure for an hour until sticky. While it was curing, I prepared the fiberglass tape by finding the center, and rolling to the center from each end, like a scroll. I carefully laid the fiberglass at the center joint, then rolled each way, lightly stretching the fiberglass as I went. The tackiness of the partially cured epoxy kept the tape in place. It also made realigning the tape a little messy. It would distort the tape a little to lift it.

I wet out the fiberglass using a 4" foam roller. It was a cool morning (for North Carolina), and everything went well. The Marinepoxy wet out the fiberglass easily. I used 21 ounces of epoxy (seven 3 ounce batches) to wet out 34' of biaxial tape. I thought that I did a good job wetting out the tape without over saturating it, but maybe I did too good of a job - about 15% of the tape was a little epoxy starved. It is fixable, though.

It looks like an olive boat now.


Next, the upper panels.

Tuesday, July 15, 2008

Cutting out the canoe panels

Thanks to a suggestion on the bateau forums (on another boat to another person) by a poster whose name I cannot remember, I decided to cut out all of the panels at the same time. Did I say thanks for that suggestion? It worked great. To do that, I had to nest the panels differently (sorry Jacques), and use four sheets of plywood instead of three. It won't go to waste, but if I were using $50 okoume instead of $11 lauan, I might stick with the original nesting.

The original nesting had two upper panels and a center panel on two sheets, and all four chine panels on the other sheet. I drew one upper panel, a center panel, and a chine panel on one sheet. I clamped four sheets of plywood in a stack, and cut all four of the chine panels and all four of the upper panels at once. Then I removed the bottom two sheets of plywood, and cut out the two center panels. As I cut the panels out, I kept the sets clamped together, and smoothed my rough spots with a belt sander. Ten panels for the price of three cuts. That's great, but the real benefit came next, when I glued up the 16' long panels.

The butt joints between panels were easy. All went just as the directions said, except that some of the pieces developed a twist or lift and did not want to mate willingly. I learned to hold the pieces flat the best I can, force a little putty between the ends, apply the fiberglass (which wet out very easily with the Marinepoxy), cover the joint with polyethelene sheeting, and weight with a 20 pound rock on top of a piece of 1/2" plywood to evenly distribute the weight. Wait 12 hours, flip the panels carefully, and repeat on the other side, no weight necessary.

After gluing I checked for symmetry by stacking the two upper panels and the two chine panels. I could not feel a difference with my fingertips. Once again, thanks to whoever made the suggestion to cut mirror image panels at the same time.

Monday, July 14, 2008

Materials

Happy Bastille Day!

I started the D4 back in 1999, and set it aside after cutting the frames and panels. I used 1/4" lauan plywood for the panels and 3/8" AC for the frames. The transom and bow transom were made of 3 pieces of lauan laminated with epoxy to 3/4". The lauan from that period was a stiff and good-looking plywood, although the center ply was thicker than the outer plies. The cut pieces were stored and moved around carefully. I can't say the same for the epoxy.

The epoxy was System Three epoxy purchased in 1999. It was stored in garages and storage units with temperatures in excess of 110 degrees in summer and hovering around freezing in winter. I was considering throwing it out and buying more, but after reading that epoxy has a very long shelf life, I tried it first. I am thrilled to say that after 9 years stored in bad conditions, the epoxy performed like new. The pumps had to be replaced.

Because I liked the lauan plywood I purchased 9 years ago for the D4, and because I wanted to build the canoe on the cheap, I purchased lauan plywood again. It isn't the same lauan plywood. The face veneer looks good, but the back veneer is ugly and full of knot holes. The veneers are very thin, and the wood has three equal plies inside. On the minus side, it splits along the middle ply. It bends like wet spaghetti. Still, I think the canoe will do what I need.

I'm using Marinepoxy for the canoe. It isn't as thick as the System Three. I have the medium speed hardener for both. In the heat of a North Carolina summer, neither allows much more than five minutes working time for a three ounce batch.

Sunday, July 13, 2008

Beginning two boats - finally!

Years ago, in 1999, I ordered plans and supplies to build a small boat - Jacques Mertens's D4 dinghy. (The D4 has since been replaced by the D5 at bateau.com.) I had a garage then, but thanks to divorce, apartmentaliving, and long-distance dating, it was carefully put aside after I had cut the hull panels and frames out. Now that I am remarried and living stably with a garage (at least for the time being - until I move again), I pulled the parts and plans out, and picked up where I left off.

But wait! I like to canoe, and building a canoe looks quicker. Even with my schedule, I'll be able to get a canoe in the water before fall. So why not build a canoe first? I looked at plans on bateau.com where I had bought the dinghy plans, and chose the 16' Hiawatha. Progress on the D4 will slow, but Renee and I will enjoy the canoe sooner.